Gravity Forms Multilingual – Easy Forms Translation with WPML
Gravity Forms Multilingual lets you create multi-language Gravity Forms. Just translate the texts and the form displays in the correct language on the front-end of your WordPress website.
A Simple and Powerful Way to Build Multilingual Gravity Forms
Easy Workflow
Edit a single Gravity form to send it for translation from the language switcher in the top-admin bar. To send multiple forms for translation, just navigate to WPML’s Translation Management Dashboard.
Flexible Translation
Translate Gravity Forms by yourself or with the help of professional translators.
No Extra Steps
Simply insert translated forms into pages using the Gravity Forms block. WPML displays the form in the correct language on the front-end.
On This Page:
- Getting Started
- Creating and Translating Gravity Forms
- Updating Form Translations
- Content Submitted into Translated Forms
- Deleting Form Translations
- Known Issues with Gravity Forms
- Getting Help
Getting Started
Start by installing and activating the following plugins:
- WPML core plugin and WPML String Translation add-on
- Gravity Forms
- Gravity Forms Multilingual
If you’re new to WPML, check out our Getting Started Guide. It quickly walks you through different translation options you can use.
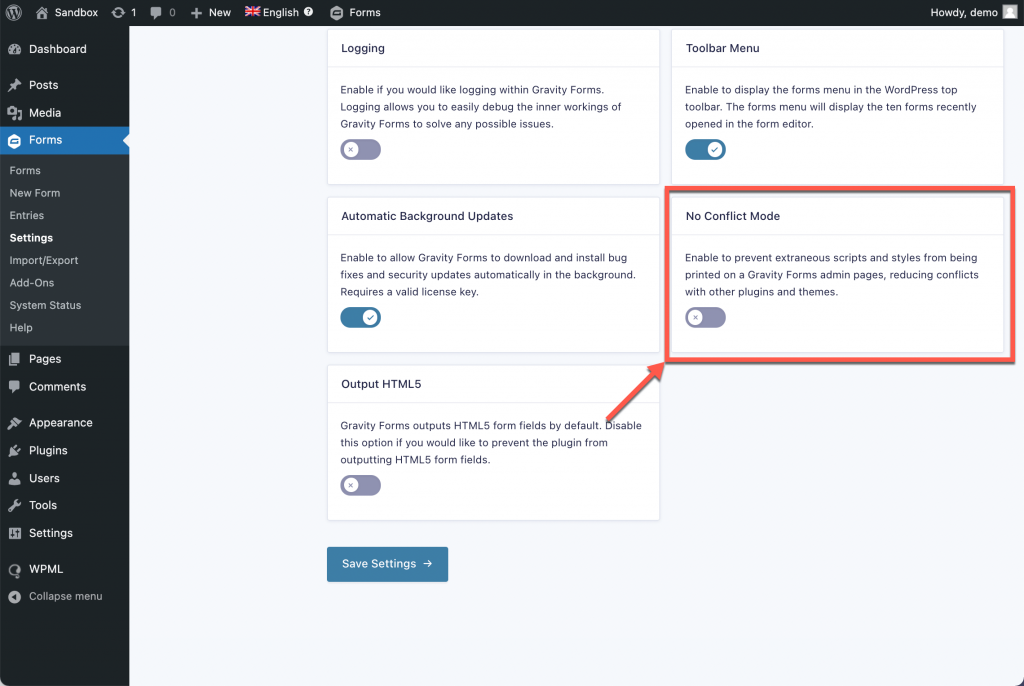
Before translating your forms, make sure that the No-Conflict Mode setting is turned off on the Forms → Settings page. When this option is enabled you cannot translate the form using the language switcher in the top admin bar.
Creating and Translating Gravity Forms
To translate your Gravity Forms with WPML, you need to follow a 4-step process:
- Create the form and the confirmations and notifications for it in your default language
- Translate the form
- Translate the sub-labels
- Insert the form into a post or page and translate the post or page
Creating the Default Language Form
To create the default language form, go to Forms → New Form. You can choose from a list of pre-made form templates or build your form from scratch.
From the Settings area, you can set up Confirmations and Notifications. These are simple messages or email notifications that you can automatically send to a user after they submit a form.
WPML recognizes the Confirmations and Notifications you set up for each form. After sending the form for translation, you will be able to translate these messages together with the rest of your form content.
Translating the Form
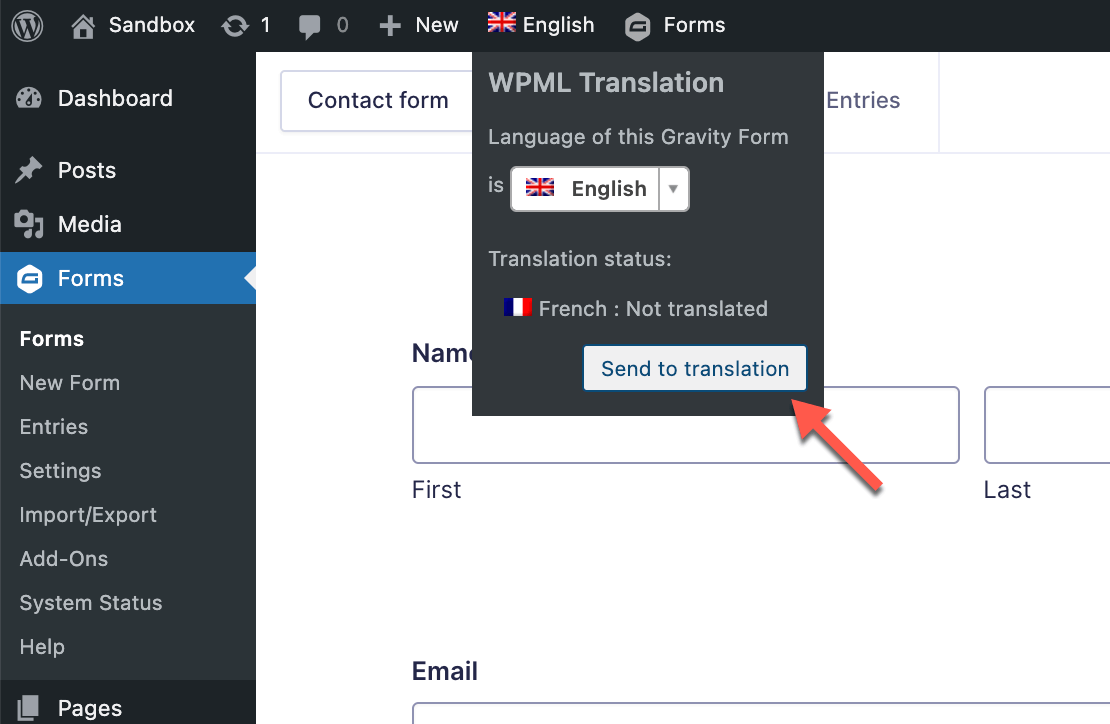
Edit the form you want to translate and hover over the language switcher. From the drop-down menu that appears, you can send the form for translation into a secondary language.
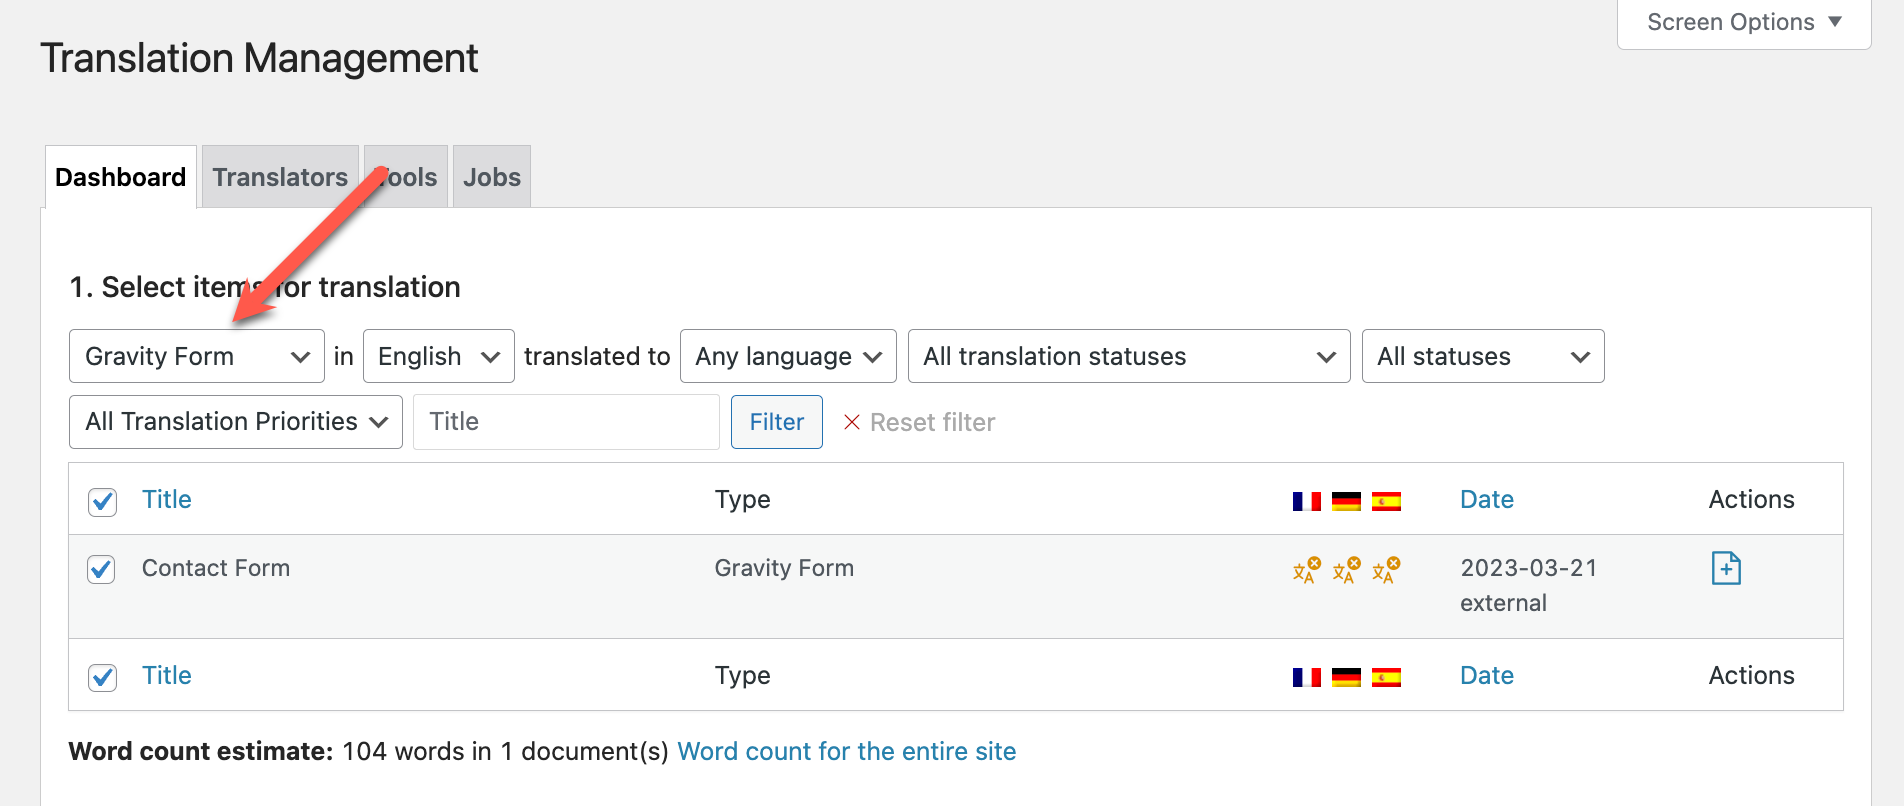
Clicking Send to translation opens Translation Management and filters the available content to show only Gravity Forms.
You can also access this list by going to WPML → Translation Management and selecting Gravity Form from the dropdown menu.
From the Translation Management Dashboard, you can select between assigning the form translations to a translator or translating them by yourself.
Sending the Form to Translators
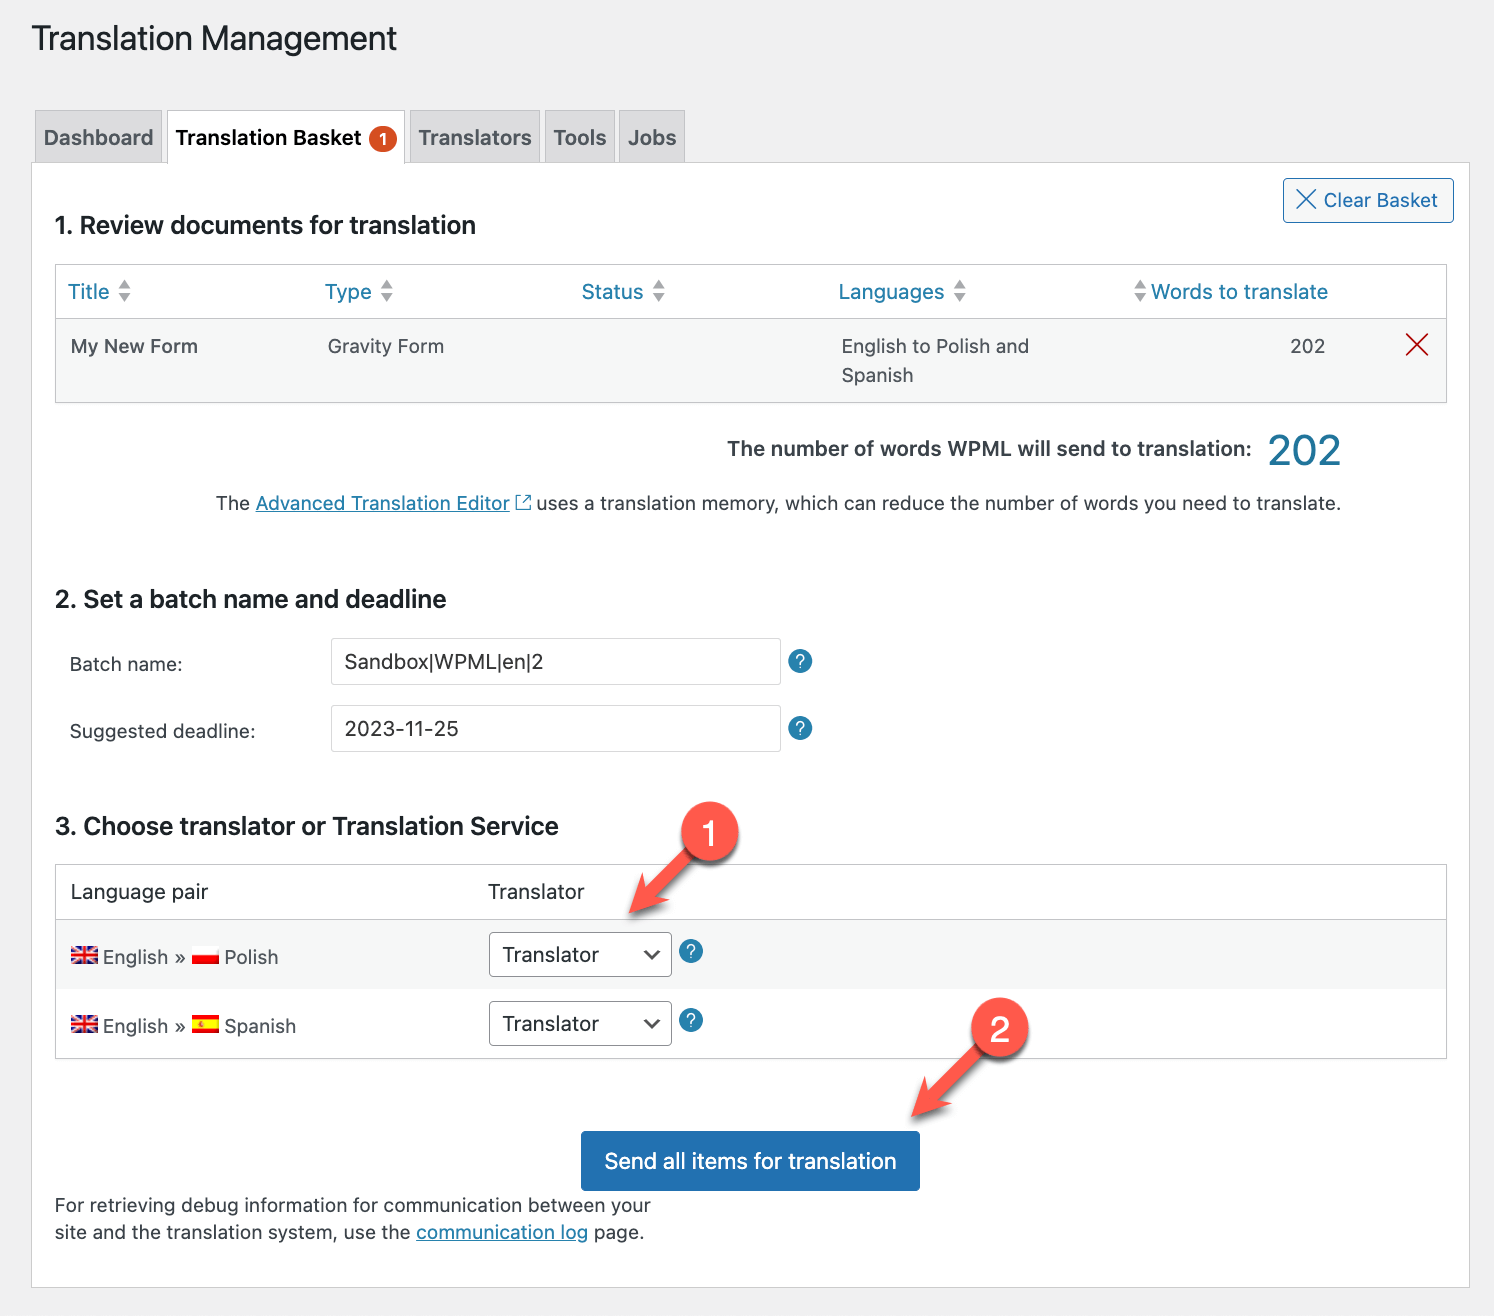
From Translation Management, you can assign forms to your translators or professional translation service.
After you add the forms to the translation basket, click on the Translation Basket tab. Choose a translator or translation service for your different language pairs and send your forms for translation.
Translating Forms By Yourself
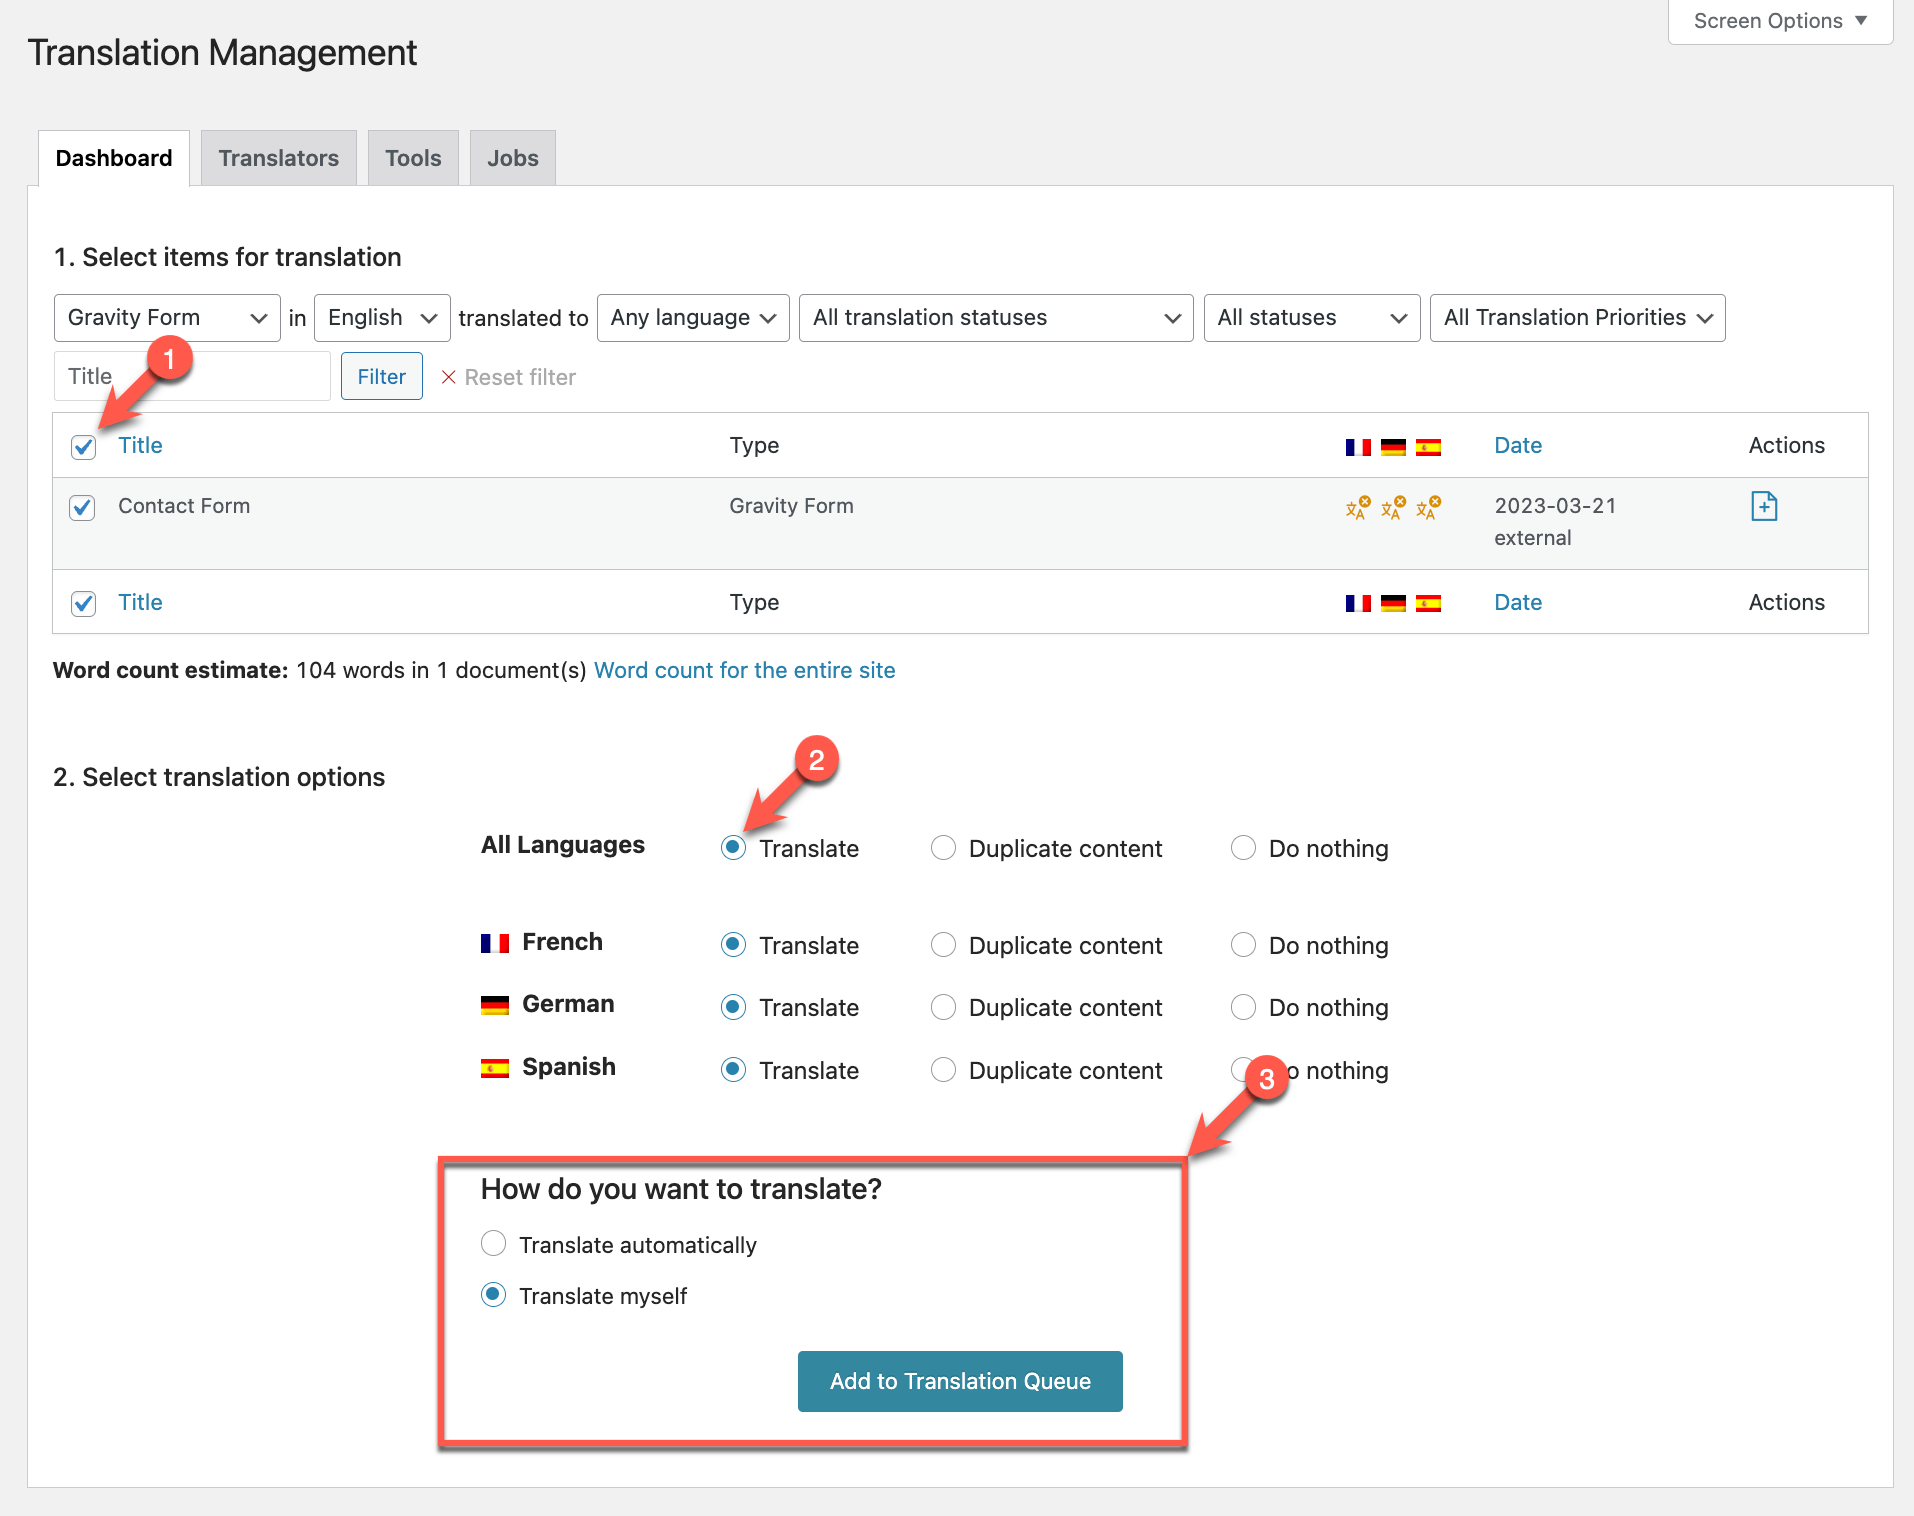
To translate the form by yourself, select the form you want to translate and the languages you want to translate it into.
Then, select the Translate myself option and click Add to Translation Queue.
Next, go to WPML → Translations and click the Translate button for the job related to your form.
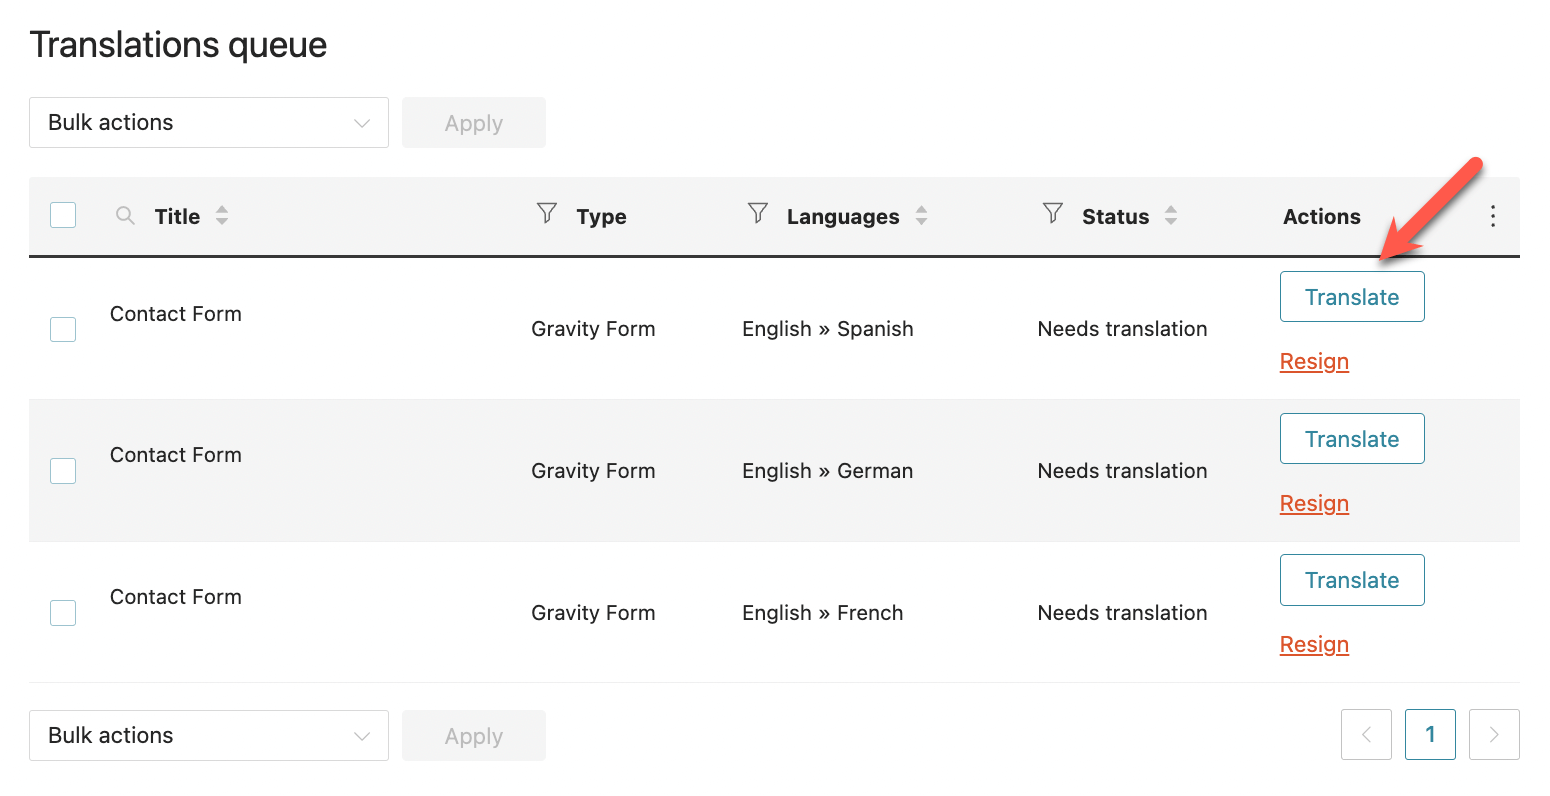
You’re taken to the Advanced Translation Editor where you can translate your form texts, main labels, and custom sub-labels. If you have automatic translation credits, the built-in automatic translation feature fills in the translations for you.
If you are translating by yourself and your default language forms include merge tags such as {all_fields} or {Name (First):1.3}, make sure to copy them to your translation. Translating the merge tags could break the secondary language form.
If you use any of the sub-labels provided by Gravity Forms by default, you need to follow the steps below and translate them in String Translation.
Translating Sub-Labels
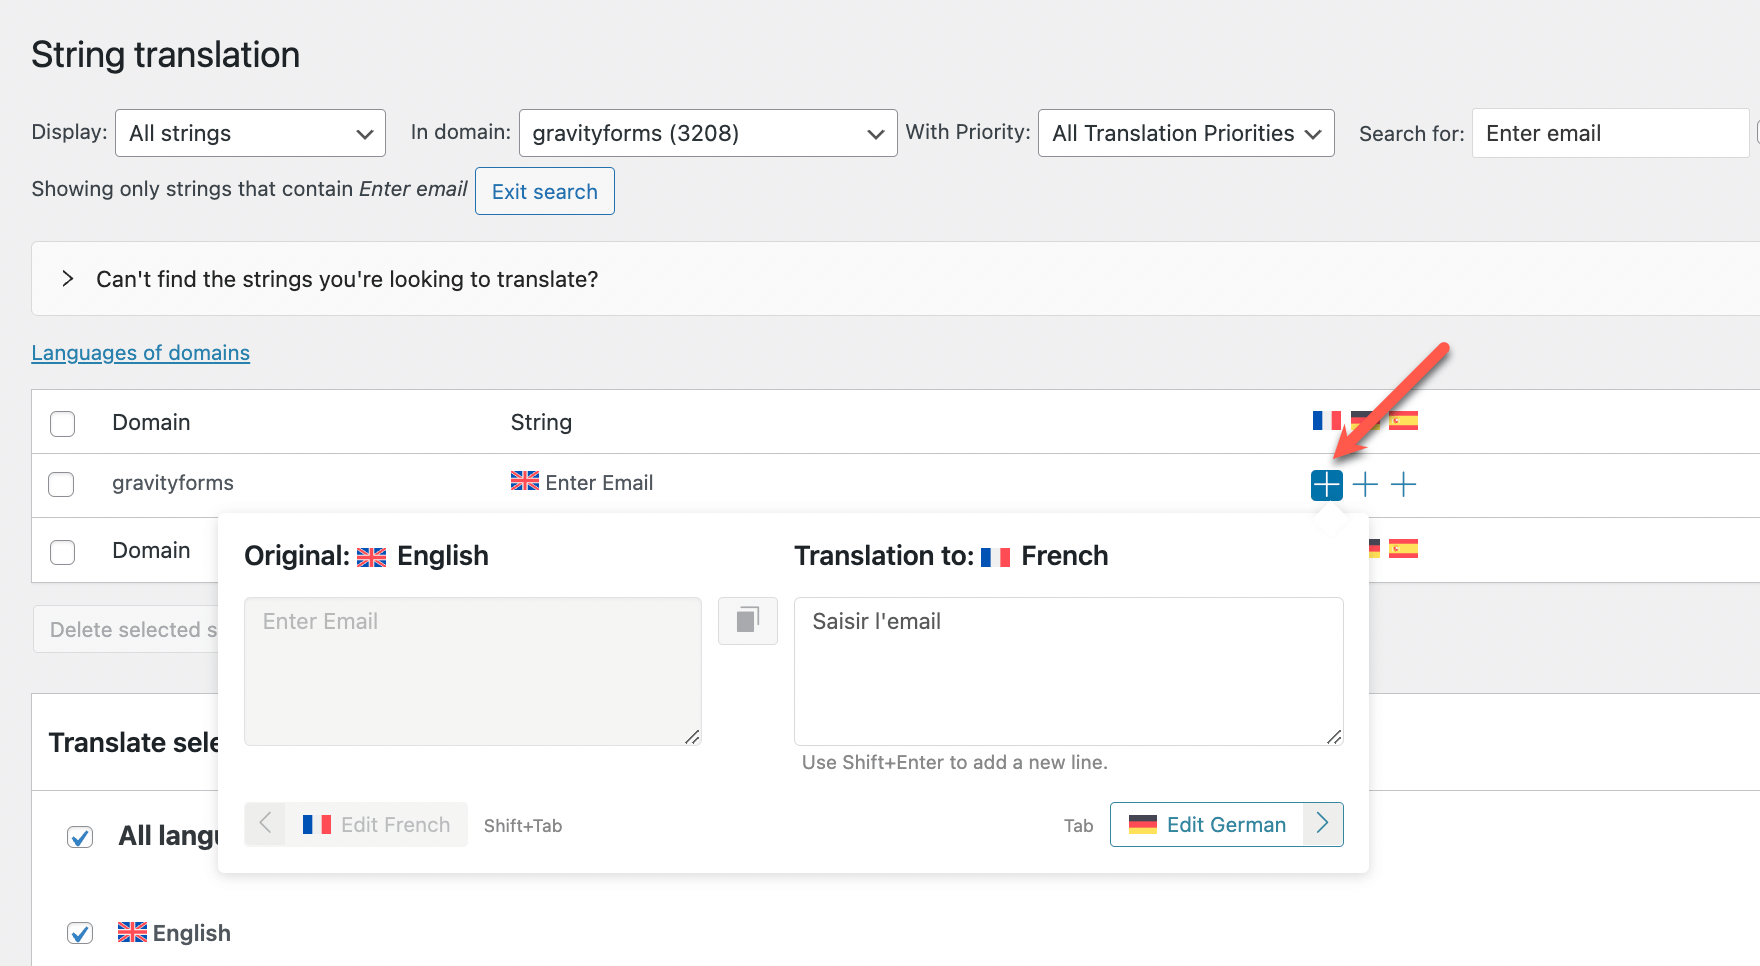
While you can translate the form texts, labels, and custom sub-labels in the Advanced Translation Editor or using automatic translation, you need to translate the default sub-labels for fields in String Translation. Examples of sub-label texts provided by default include First, Last, for the Name field, and Enter Email and Confirm Field for the Email field.
To do this:
- Go to WPML → Theme and plugins localization. In the Strings in the plugins section, select Gravity Forms and click the Scan selected plugins for strings button.
- Once scanning is complete, go to WPML → String Translation. Use the In domain drop-down menu to search for strings in the gravityforms domain. You can also use the search bar to find the exact strings you want to translate.
- Click the plus icon next to the string you want to translate and hit enter to save it.
Using Translated Forms In Pages
After translating all your form content, you can insert the form into any post or page using the Gravity Forms block.
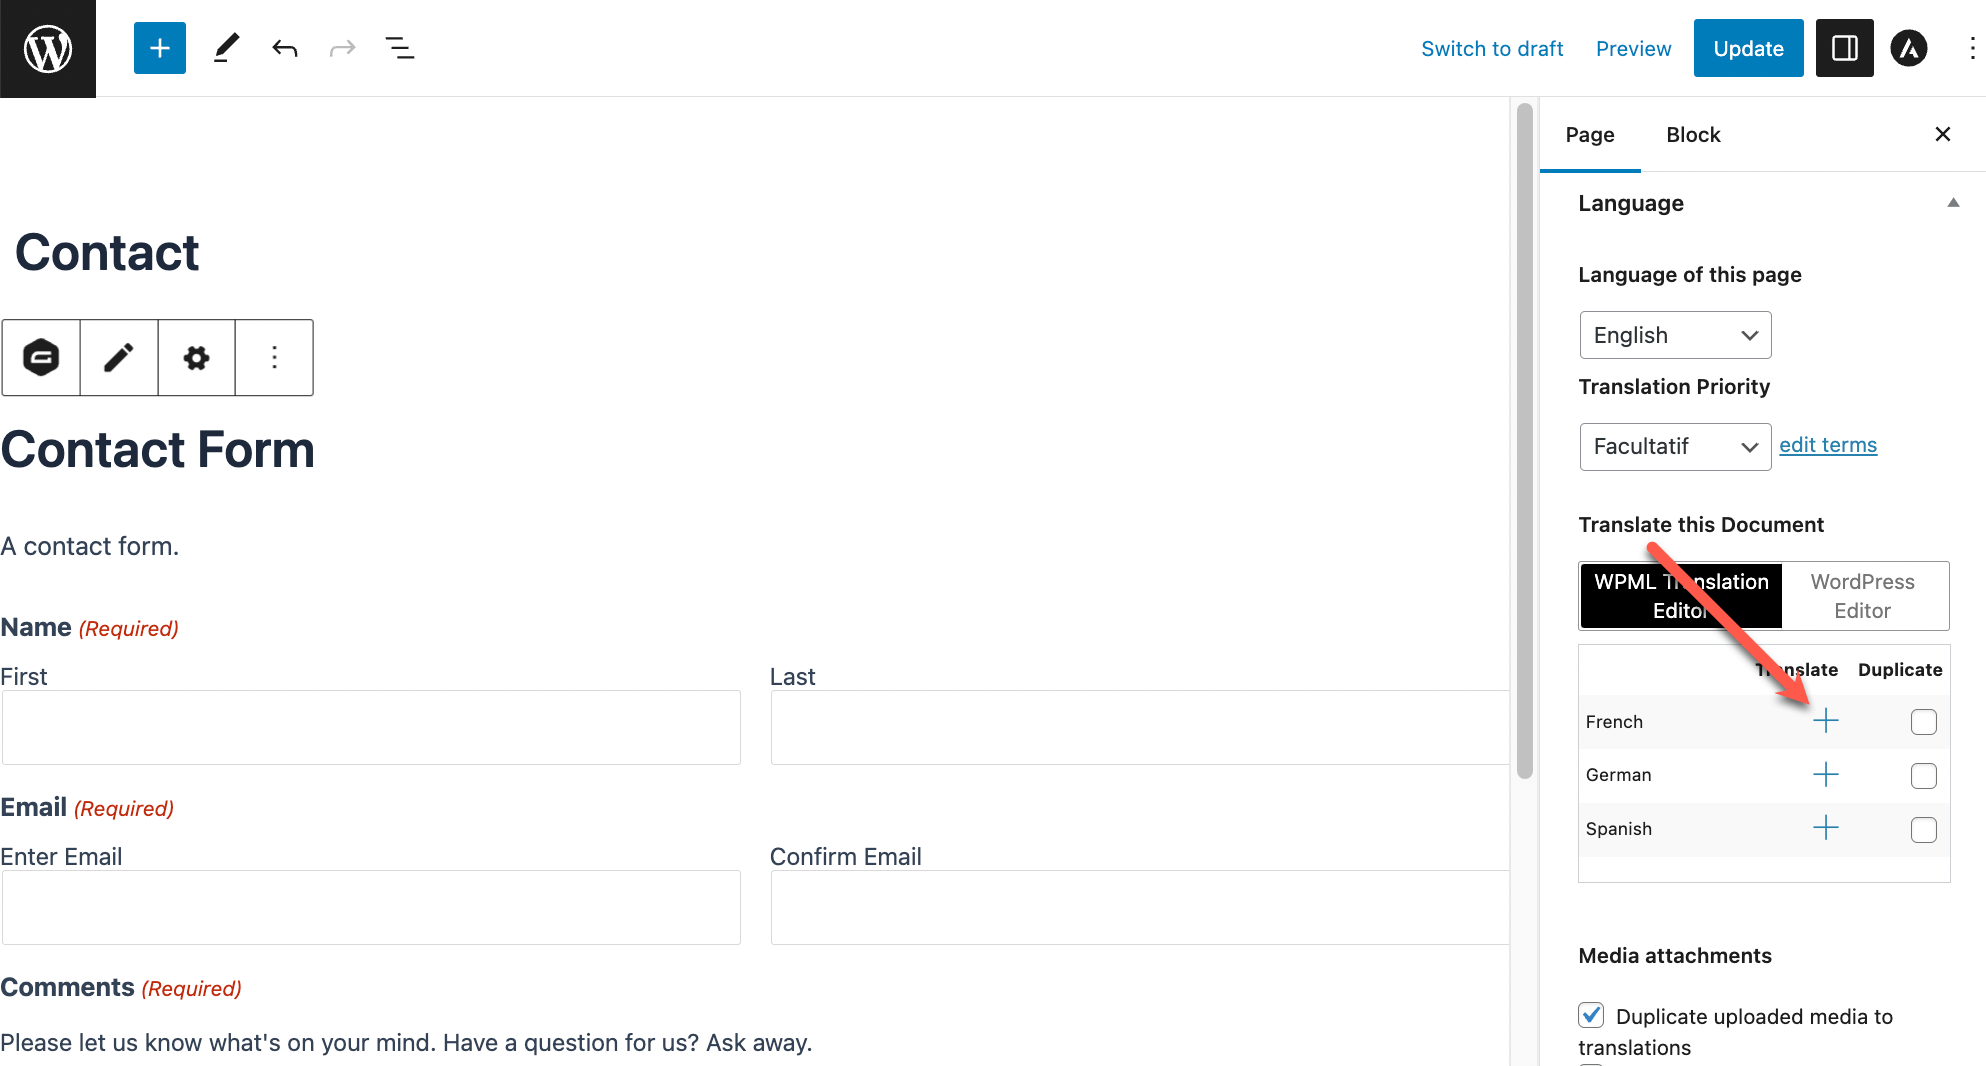
Then, simply make sure to translate that post or page as well. You can do this by clicking the plus icon from the Language tab in the right sidebar.
When users visit the page in the secondary language, WPML will automatically display the form in the correct language.
After submitting the form in the secondary language, your users will also see the translated confirmation message and receive the translated notification email in their language
Updating Form Translations
If you update the default language form by adding, deleting, or updating any of the content, you will need to update the translated versions.
Certain types of fields in Gravity Forms include multiple choices that users select, like Drop Downs and Radio Buttons. Changing the position of options in multiple-choice fields that have already been translated may result in those fields losing their translations. In this case, you need to translate these fields again.
To update the translation of a form or translate new content that you added to the form, follow these steps:
- Navigate to WPML → Translations.
- The Status indicates that the translation needs an update. Click on the Edit button to update the translation.
- In the Advanced Translation Editor, review the automatic translations for the new field(s). If you don’t have translation credits, you’ll need to add the translations by yourself. Click Complete to update the translation.
Content Submitted into Translated Forms
Please note that the Gravity Forms plugin does not detect a language of contents submitted in a form. When you submit content into a translated form, that content will still be created in the default language.
You can use Gravity Forms hooks and filters to write your own application logic and set the language of the submitted content after Gravity Forms creates it.
Deleting Form Translations
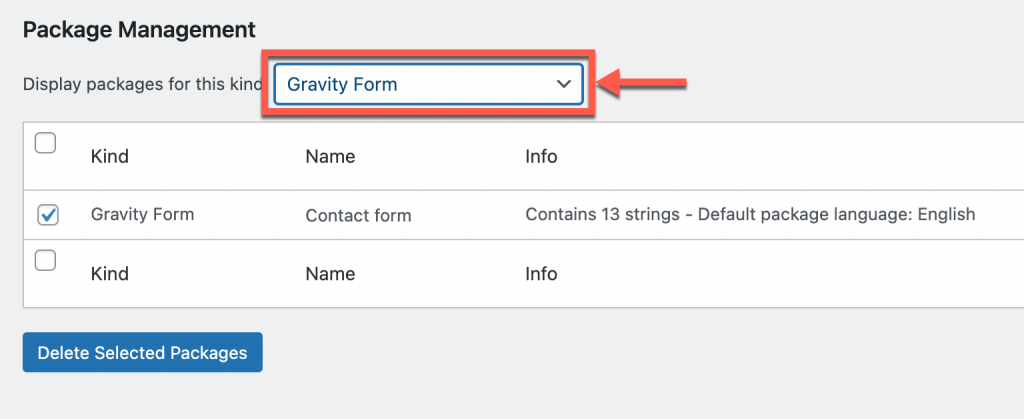
To delete a form’s translations, go to WPML → Packages and choose Gravity Forms from the dropdown menu. Select and delete the package that matches the name of the relevant form.
If you want to translate the form again later and don’t see it in WPML → Translation Management, simply re-save the form.








Reviews
Clear filtersThere are no reviews yet.